Adding readings: By searching in the Readings Online database.
Adding readings this way will save you time, as you will not have to add all of the metadata and there it is less likely that the reading will have to be vetted by Readings Online staff.

BEFORE YOU START
What is RIS?
- RIS is a standard file format for citations
- RIS saves you time in Readings Online
- If you upload an RIS file to Readings Online it automatically fills in details of your reading.
- RIS files are available from
- Reference Management software
- databases
- google scholar
- library catalogue
- Common ways to download a RIS file
Where you can find the RIS download option in major databases
- Login to the LMS and open the subject page, then click on the link for Readings Online, (see step 2 of Linking Readings Online to Canvas for the first time).
- Click on the Add button from the drop-down menu and click on the Find an Existing reading option. (Please note, that all information formats are referred to as "readings" in this guide.)

- Click on the Find button

- eReserve Plus is already chosen in the Locations box, so do not change it, (A).
- Choose the format of the reading from the drop-down menu, (B). (Please note that the book and journal options are straightforward. If assistance is required, when deciding on the format of your reading, please see metadata categories under Manage readings).
- Choose a search option, from the drop-down menu. (C). The example below shows Title for a title search.
- Type in a search.
- Click on the Find button, (D).

- A list of options will appear, if the database finds suitable matches.
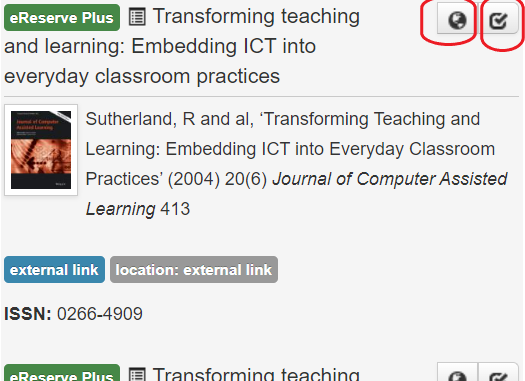
- Click on the Globe icon, to check if the reading is suitable.
- Click on the tick icon if the reading is suitable.
- To the right of the Readings Online database search form there is a Scheduling Details form. Click on either the Required or the Recommended button, for the reading. (12)
- Type in Notes for library or Notes for Students, if required. (13)
- Click on the Submit button. (14)
- If there is not a suitable reading in the Readings Online database, click on the Back button. (15)

- If there is not a suitable reading in the Readings Online database, go back to the Add button and follow the instructions from Add readings manually.
- If the reading does go directly into the classes' Canvas shell, test the link by clicking on the Globe icon, above the reading.
![]()
- Do not forget to click on Publish button, when students are required to access readings.

- The Readings Online software may send you out an automated email. If assistance is required in understanding the email please look at View reading status page under the Manage readings tab. If assistance is still required please email readings-online@unimelb.edu.au
WHAT
HAPPENS
NEXT?
A link to an electronic resource
- Will be ‘Active’ if the availability period has started or ‘Pending’ .
- Test link by clicking on the globe icon.
PDF file
- Will be reviewed for copyright compliance.
- This usually takes 48 hours but may be longer in peak periods
- Once approved, test that the document opens correctly.